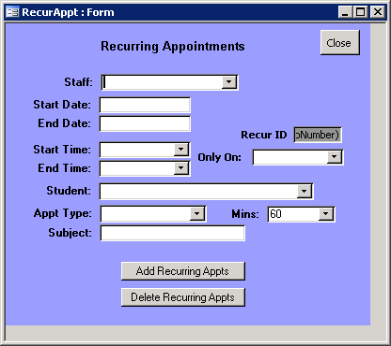
The Recurring Appointments form can be used to make appointments 1) over an extended period of
time, 2) on selected days of the week or 3) for appointments lasting longer than one hour.
To make a recurring appointment, select a staff member from the staff look up table by pressing the
down arrow, selecting the staff member and then enter.
Enter the Date range (start date of the first appointment and end date of the last appointment). The
same date can be entered into start and end fields, if the appointment covers a range of times for only
one day.
Enter a time frame by selecting the starting time block and the ending time block. Appointments are
made for a specific hour, the “9 am hour” for example. For a one-hour recurring appointment, the start
and end time should be the same. If a “10 am end time is selected, it would create a two hour
appointment (the 9 am hour and the 10 am hour). The default (60 minutes) would not apply and can
be left. If a recurring appointment is for only 30 minutes, change 60 to 30.
If the recurring appointment is for only one specific day of the week, in the desired date range, enter
the desired day. Note: If this option is not selected, appointments will be scheduled for all days in the
date range for the selected time frame.
Select a student for whom the recurring appointment is to be made. Click the down arrow to get a list
of students to select from. Select the type of recurring appointment desired, from the Look up table. A
weekly one hour tutoring appointment could be a typical entry.
The subject is an optional narrative field to explain any entry. This entry will appear in the subject line
of the appointment if a college to personal appointment is made (see below).
When completed, click the “Add Recurring Appts” button.
Non Student recurring appointments/events may also be made for such things as college meetings or
personal things. The appointment type for these uses is either “College or Personal.” A special
designation called “Reserved” has also been added to the student list for these purposes. The subject
field is used to identify the type of appointment. Whatever is typed into this field will show on the
appointment calendar. Note: This is the same process used for regular appointments- described
earlier.
- Reserved Time Blocks may also be set aside for “walk in students” or other activities like office
time. Instead of selecting a student, the same “Reserved” designation should be used, the
appointment type is college and the subject line should read Walk-ins.
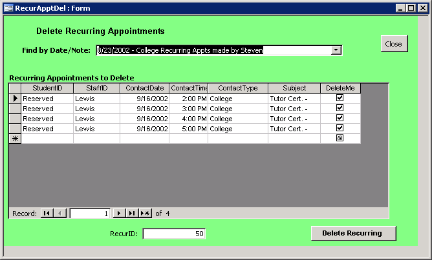
Delete Recurring Appointments
To delete a recurring appointment, click the button at the bottom and use the down arrow in the “find”
field to bring up a list of previously entered recurring appointments. Once selected, the entire
recurring schedule will be displayed in the window. Use the “delete me” check box to mark the
individual appointments to be deleted.
Note: Specific entries may also be changed directly in the table, by entering changes and saving the
table (click the “pencil” at the beginning of the row). When you have selected items to be deleted, click
the “delete recurring” button in the lower right hand corner.
Recurring appointments can also be deleted or modified from the daily calendar by double clicking on
any appointment time block. Select the “delete recurring appointment button” on the
appointment/event form and all appointments in the recurring sequence (of which the appointment
shown is just one) will be deleted.